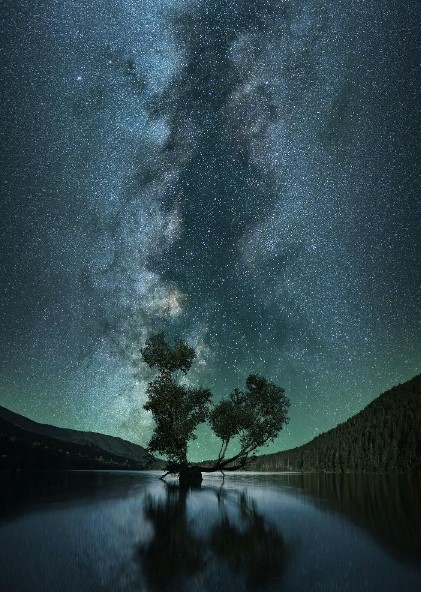
Imagine a serene summer night, the air neat and cool as you find a secluded spot far from the city lights. You’re wrapped in a cozy blanket, nestled into a soft patch of grass. The Milky Way arcs overhead, a luminous river of stars stretching across the inky black sky. Beside you, your camera is perched on a sturdy tripod, ready to capture the night’s celestial wonders.
You take a deep breath, feeling the tranquillity of the moment. The only sounds are the distant calls of nocturnal creatures and the gentle rustling of leaves in the breeze. You adjust your camera settings, selecting a long exposure to soak in the faintest glimmers of light from distant galaxies and nebulae.
As the shutter clicks open, you gaze up at the sky, marvelling at the sheer number of stars. The constellations seem to come alive, each star a tiny brushstroke in a grand cosmic painting. You spot the faint glow of the Andromeda Galaxy, a smudge of light that represents millions of stars and countless mysteries
Minutes pass, and your camera continues to collect light, turning the invisible into the visible. You sip a warm drink of your coffee, savouring the peacefulness and the sense of connection to the universe. Finally, the shutter closes, and you eagerly wait for the result.
You smile, knowing you’ve captured a piece of the cosmos, a moment in time that will remind you of this magical night. Astrophotography has not only allowed you to see the universe in a new way but also to feel a part of something infinitely larger than yourself.
What is Astrophotography?
Astrophotography is the art of capturing images of celestial objects, from the moon to distant galaxies. Whether taken with a simple point-and-shoot camera, a sophisticated telescope, or even the Hubble Space Telescope, these photographs allow us to explore the wonders of the universe.
Equipment Required:
Camera: For astrophotography DSLR/Mirrorless cameras are preferred. Many astrophotographers also use dedicated astronomy cameras.
Lens: A wide-angle lens (14mm to 35mm) is great for capturing expansive views of the sky. For deep-sky objects, a telescope or telephoto lens is essential.
Tripod: A sturdy tripod is a must to keep your camera steady during long exposures.
Tracking Mount: To capture sharp images of deep-sky objects, a tracking mount that follows the Earth’s rotation is crucial.
Factors to consider for astrophotography
Aperture
Definition: The aperture is the opening in a lens through which light enters the camera.
Represented in: f stops (e.g., f/2.8, f/4, f/8).
Effect: A wider aperture (smaller f-stop number) lets in more light and creates a shallow depth of field, making the background blurry. A narrower aperture (larger f-stop number) lets in less light and creates a greater depth of field, keeping more of the scene in focus.
Shutter Speed
Definition: The amount of time the camera’s shutter is open, exposing light to the camera sensor.
Represented in: Seconds/fractions of a second (e.g., 1/1000, 1/60, 1″).
Effect: Faster shutter speeds freeze motion (ideal for sports photography), while slower shutter speeds can create motion blur (useful for capturing light trails or waterfalls).
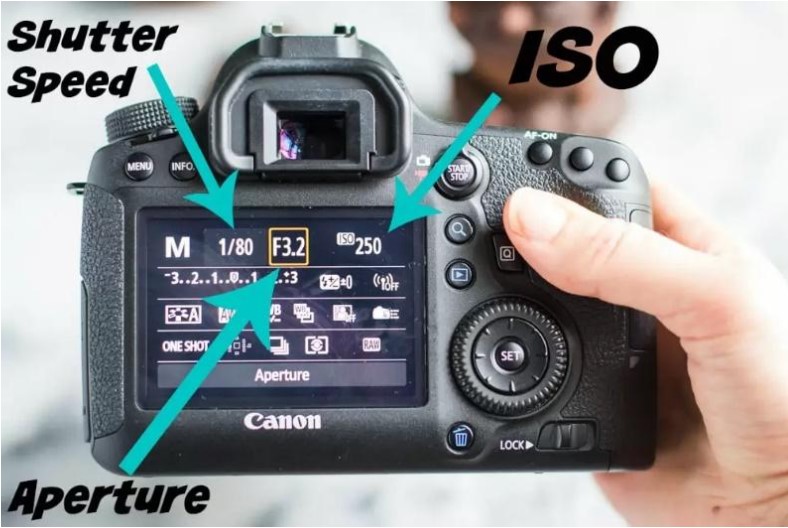
ISO
Definition: The sensitivity of the camera’s sensor to light.
Represented in: ISO numbers (e.g., ISO 100, ISO 800, ISO 3200).
Effect: Lower ISO values produce less noise and clearer images but require more light. Higher ISO values are useful in low-light conditions but can introduce graininess to the image, making it less clear and sharp.
Exposure
Definition: The amount of light that reaches the camera sensor, creating an image.
Components: Controlled by aperture, shutter speed, and ISO.
Effect: Proper exposure ensures that images are neither too dark (underexposed) nor too bright (overexposed).
White Balance
Definition: Adjusts the color balance of an image to make it look natural under different lighting conditions.
Settings: Auto, Daylight, Cloudy, Tungsten, Fluorescent, etc.
Effect: Correct white balance ensures that colors are rendered accurately, preventing a photo from looking too blue (cool) or too orange (warm).
Focus
Definition: The process of adjusting the lens to make the subject appear sharp in the image.
Modes: Manual Focus (MF) & Autofocus (AF).
Effect: Proper focus ensures that the subject of your photograph is clear and crisp.
Focal Length
Definition: The distance between the lens and the image sensor when the subject is in focus.
Measured in: Millimeters (mm).
Effect: Determines the angle of view and magnification. Short focal lengths (wide-angle) capture more of the scene, while long focal lengths (telephoto) magnify distant subjects.
By using these settings and tips, you can maximize your DSLR’s potential for astrophotography and capture breathtaking images of the night sky. Happy shooting!
Post-Processing: Bringing the Stars to Life
Post-processing is a crucial step in astrophotography. It helps to enhance the details, reduce noise, and bring out the beauty of the night sky that may not be immediately visible in your raw images. Here’s a guide to post-processing your astrophotography image
Essential tools and software
- Adobe Photoshop: Widely used for its powerful editing capabilities.
- Adobe Lightroom: Excellent for organizing and basic adjustments.
- DeepSkyStacker: Free software for stacking multiple images to improve signal-to-noise ratio.
- PixInsight: Advanced software for astrophotography processing with specialized tools.
- Star Tools: Another option designed specifically for astrophotography.
Steps
1. Stacking Images
Why: Stacking multiple exposures reduces noise and enhances detail by averaging out random noise and reinforcing the signal.
How: Use DeepSkyStacker or a similar tool. Import your raw images, align them, and stack them. The software will produce a single image with reduced noise and increased detail.
2. Initial Adjustments in Lightroom or Photoshop
Exposure: Adjust the exposure to bring out the details in the stars without overexposing.
Contrast: Increase contrast to make the stars pop against the dark background.
White Balance: Adjust the white balance to achieve natural colors. This can usually be set to Daylight or tweaked manually.
3. Noise Reduction
Why: Long exposures and high ISO settings introduce noise, which can obscure details.
How: Use noise reduction tools in Lightroom or Photoshop. Be careful not to overdo it, as excessive noise reduction can blur fine details.
4. Enhancing Details
Sharpening: Apply sharpening to enhance the fine details of stars and other celestial objects.
Clarity: Increase clarity to enhance the midtone contrast and bring out the texture in nebulae and the Milky Way.
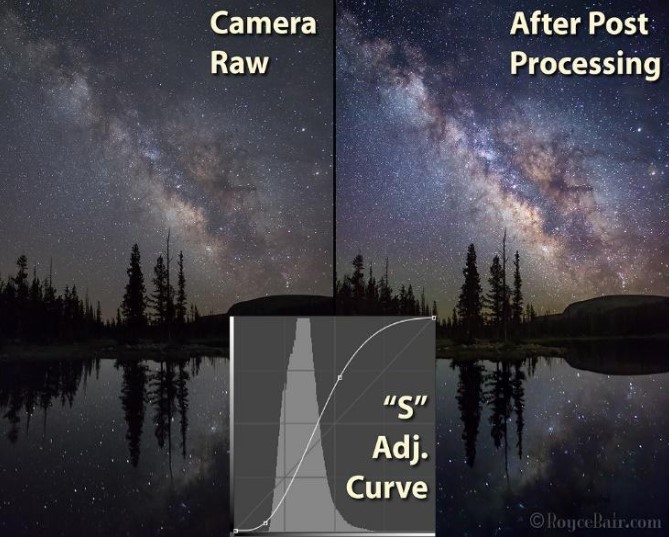
5. Adjusting Levels and Curves
Levels: Adjust the levels to set the black point and white point, ensuring the darkest parts of the image are truly black and the brightest stars are not clipped.
Curves: Use curves to fine-tune the contrast and brightness. A slight S-curve can enhance contrast without losing detail.
6. Color Correction
Saturation and Vibrance: Increase saturation and vibrance to bring out the colors in stars, nebulae, and the Milky Way.
Selective Color Adjustments: Use selective color adjustments to enhance specific colors, such as the reds in nebulae or the blues in star clusters.
7. Removing Light Pollution and Gradients
Why: Light pollution and gradients can distract from the main subject and reduce image quality.
How: Use gradient removal tools in Photoshop or specialized astrophotography software like PixInsight. Gradients can often be reduced using the Gradient Xterminator plugin for Photoshop.
8. Final Touches
Crop and Straighten: Crop the image to remove unwanted edges and straighten the horizon if necessary.
Vignetting: Add a slight vignette to focus attention on the center of the image.
Star Reduction: Reduce the size of stars slightly to make the nebulae and other deep-sky objects stand out more.
Conclusion
Astrophotography requires patience, persistence and practice. The more you shoot, the better you’ll understand how to adjust your settings and composition to suit different conditions and subjects. Don’t be discouraged by initial challenges; every mistake is a learning opportunity that brings you closer to capturing that perfect shot. Understanding the core settings of your DSLR camera—such as aperture, shutter speed, ISO, and manual focus—is crucial for capturing stunning images of the night sky. By mastering these basics, you can take clear and detailed photographs of stars, planets, and other celestial phenomena.

